Showing posts with label sculpture. Show all posts

Thursday 3 October 2019

Tam

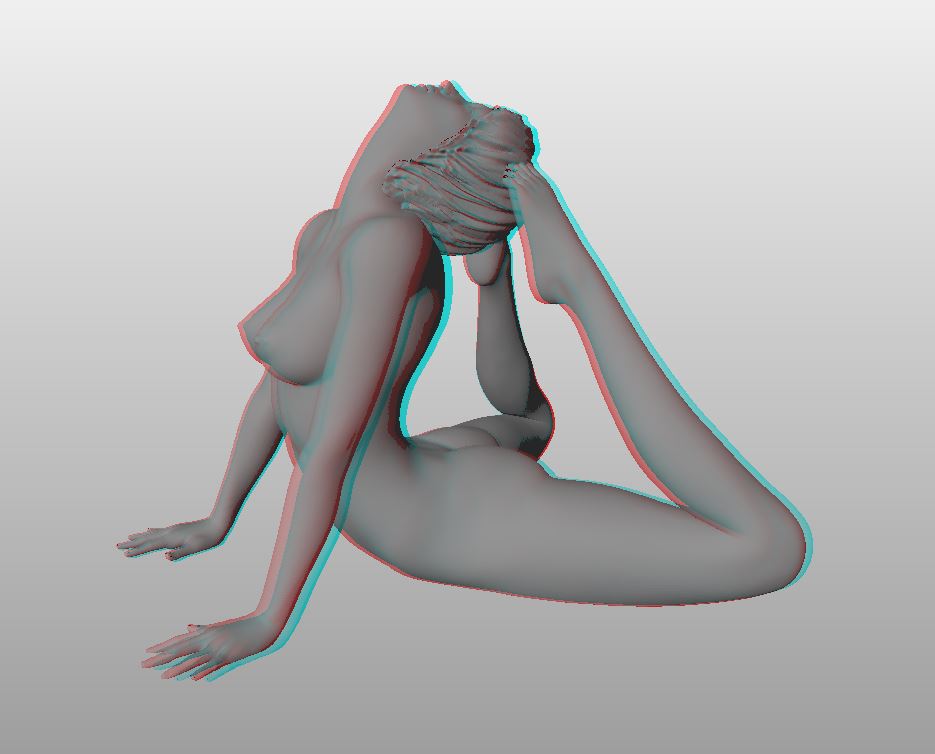
I've been wanting to sculpt this pose for a long time. I love the intertwined limbs and the opportunity to rest the chin on the knee to avoid using support material. I think the photo is by Tam Nguyen but I haven’t been able to locate it online. 


This type of pose is sometimes called an ‘implied nude’ because the breasts and genitals are not visible in the photo. This doesn’t usually affect the 3D version, of course, since a sculpture can be viewed from any angle, but in this case the only way to pose the figure is with the breasts compressed by the limbs.

My first attempt worked out OK as a pose, but failed as a 3D print because I tried to make the hair out of individual strands and the retractions just ground up the filament - should have guessed!

So I reverted to my tried and trusted formula of selecting a nice hairstyle and then shrink-wrapping and resculpting it in Blender.


I chose a nice metallic grey Fillamentum PLA filament for this print and sliced the model with Simplify3D. The print was made on my new Sapphire-S coreXY printer from twotrees adapted with a Flex3Drive extruder system. This keeps the print-head as lightweight as possible, giving some of the smoothest prints I've ever achieved.


I'm particularly pleased with how well the sculpted hair has printed on this model. It can still be improved further, though, and I'm working on that. The second version, lower down this page, has more detail sculpted in the flatter areas.


I had to add automated support material in a couple of places - under the left breast and the left front part of the hair. Unfortunately, this did leave some nasty scarring visible on the thigh and abdomen, which I was unable to hide. This set me thinking about other ways to add support.

It occurred to me that one way to avoid the ugly scars left after removing support material would be to try and construct a sort of platform sitting over the left leg on which the support could then rest. I fired up Blender and came up with these pieces of scaffolding.


The larger piece supports the nose and the dangling strands of hair. The smaller piece supports the underside of the left breast.


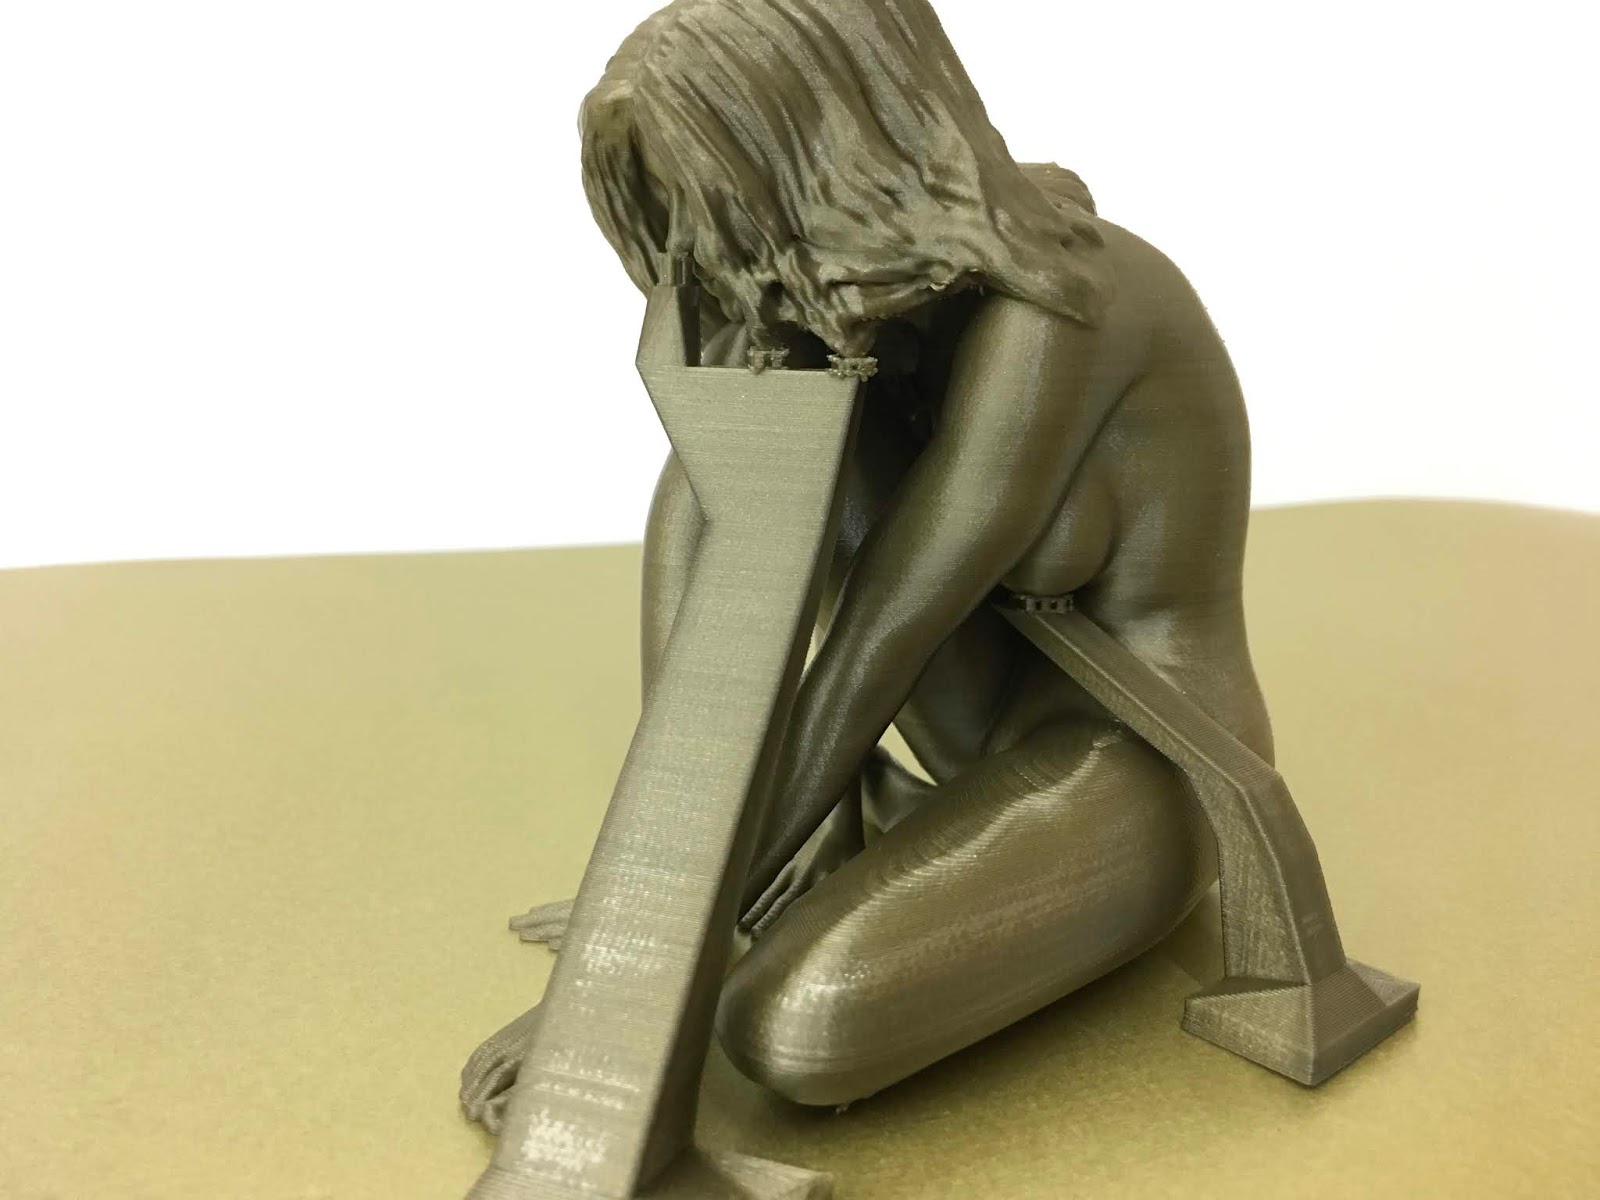
The innovation here is that I realised I could combine manually created scaffolding that projects into difficult to reach areas, with auto-generated support provided by the slicer to fill in the last few millimetres.
By using this approach, I can scale the model up to any size without having to worry about the support gap - it will always be perfect for my printer because the final gap is still decided by the slicer software.


Both support pieces broke away cleanly from the model leaving no scarring anywhere on the thigh or abdomen - a much cleaner result!
Notice in the picture below how the small chunks of auto-generated support sit on top of the large manually created blocks.


You can also clearly see here how much better the hair looks now with the extra detail sculpted into it.

Tuesday 5 May 2015

Not size zero

So, Daz 3D have finally seen the light and changed their EULA to allow 3D printing of their models, but only for non-commercial use. It is a relief to be able to use the software and models legally now, but I still can't share any of the meshes or sell the models that I create.

As you will know, if you have read any of my previous posts, I enjoy the challenge of trying to create beautiful sculptures by posing a 3D model to match either an existing photograph or an image that I have in mind. One of the aspects I have spent less time on is adjusting the shape of the woman's body. I received a comment from a reader asking whether I ever sculpted larger women and I had to admit that I hadn't tried yet, so this time I thought I would deviate from the default, skinny model body shape and try creating a woman who looks more typically average in body size.

I used the Victoria 6 body with the HD mesh add-on, which has more natural curves around the joints. I began with an idea for a pose in a fairly relaxed style and then played around with all the different character shape parameters , giving a modest 20% increase to the 'Heavy' setting and a 70% boost to the 'Weight' parameter. I'm not entirely sure what the difference is but it's quite an interactive process, so I just move the sliders slowly and stop when I see the effect I'm looking for.


Daz haven't just given permission for 3D printing of their models, they've simplified the whole process too. Upgrading to the latest version of the Genesis 2 models brings a new option to the Anatomy section.


This rather gruesome-looking add-on modifies the geometry of the eyes and mouth, turning them into closed meshes. It also replaces the front of the eye with a new, more sculptural representation of the iris and pupil.

I chose an elegant, raised hairstyle that still required my previously-described shrink-wrap technique to make a fully printable model.

The pose would clearly need support material turned on in several areas, as can be seen in the print below.


This is quite a small print, taking five and a half hours to print at 0.1 mm resolution. There are still some small blemishes left after removal of the support material, particularly on the underside of the model. There are also signs of irregularity in the Z-direction which need further investigation.


Overall, a very satisfying project.


Sunday 20 July 2014

Shame

I'm going to try and create a sculpture based on this picture next. I like the off-balance lines, the hidden face and the twisted shape.


The photo is by Tomas Rucker and is called 3 in his White series of nudes.

Here's the model I have created so far, viewed in Blender. The pose is clearly not identical but you can see where it takes its inspiration from.


When I came back to work on this pose I wasn't happy with it. The sinuous nature of the original pose had almost completely gone and the new hand position somehow changed the story. I decided to do some more work on the posing.


Then I thought it might be interesting to document the steps needed to make a posed model printable.

Hide the hair
Remove the eyelashes

Circle select eyes and mouth in side view

Shift-H hides everything else. Trim out the eyes and mouth and close up the holes in the mesh.

Hair models in character posing software are almost always totally unprintable items. I have found that the quickest way to make them printable is to use the ShrinkWrap modifier on a dense Isosphere placed in a position surrounding the hair model. Then using the project option in a negative direction, you can send all the points of the sphere inwards until they meet some point on the hair, leaving you with a single water-tight mesh. Some fairly intense smoothing removes all the jagged edges and leaves a very passable, and printable, copy of your chosen hair design. 


This just needs Boolean merging with the head which usually works OK, as long as the eyes and mouth have been fixed first. 

Now we need to deal with overlapping limb parts. There are several ways of doing this.
1. The quick and dirty method.
Use Autodesk's Project Miller to re-skin the visible external surface which hides any internal overlaps.
2. Use sculpt mode to flatten overlaps from the inside.
3. Use Boolean union to eliminate the overlaps. This option is interesting but doesn't work on a single mesh with overlapping parts. So why not just chop up the parts into separate meshes? Worth exploring, I think.

I started at the feet and worked upwards, using option 2 to eliminate any of the areas where the mesh of one limb poked through another. There is a typical example where the thighs cross. I used Box select to highlight all the affected vertices and then Shift-H to hide everything else.


From the inside you can see the bulge of the left thigh poking through into the inside of the right thigh, and vice versa.


I started by changing from Edit mode to Sculpt mode and then using first the Flatten brush and then the Smooth brush on the bulge to make it disappear. 


By working from both sides I could keep the contact area flat.


This works well where there is a small bulge across a large area, but is less effective where a larger, more complex part needs removing. So for the intersection of the arms and the left breast I decided to try a different tack and used option 3.

I rotated the model by 35 degrees around the vertical so that a horizontal plane would neatly bisect the upper arms. I then loaded the model into NetFabb which has a very nice plane cut function which provides a kind of X-ray preview of the slice before making the cut.


My cunning plan was to slice the model into a number of separate parts, make each one into a separate water-tight mesh and then Boolean merge them back together thus dealing with a number of complex overlaps at a stroke.


After making the cut, each half needed to be saved separately. The forearms, in the lower half, could then be selected and split off into a separate model. Here is the main torso piece.


My plan worked almost perfectly, only failing when the last piece in the sequence refused to Merge with the rest. I suspected that this was because the Boolean engine was struggling to cope with the intersecting parts and closing the loop of a torus and recognising the relative inside- and outside-ness of both ends at the same time. I fixed that by making another thin cut that took a slice out of the arms in an area with no complex intersections. Using that slice as the final merge then worked successfully. 

I added a simple bevelled cylinder to the base to make a stand. Eventually, I had reached the point where the only crossed meshes remaining were in both armpits. I spent a fairly lengthy mesh-editing session trying to clean up the mess but finally decided to take the easy way out and used Project Miller to re-skin the model for me. Don't know what I'd do without that bit of kit!

The main reason for going to all this trouble with the model was so that I could use Simplify3D as my slicer. Cura is better at handling faulty meshes but Simplify generates better support material that breaks cleanly away after printing.

I had intended to print this model on my tall delta printer, but it isn't coping well with this hot weather and the motors seem to be prone to skipping steps. So I went back to the Mendel90 and printed a small test version.

3D printed version in coffee-brown PLA before and after removing the support material.


Just like Pensive, one of my earliest works, the fingers are only slight wider than the extruded filament at this scale. It really needs to be printed twice as big as this. As soon as the cooler weather returns I'll try again on the delta printer.

Saturday 31 May 2014

Leaning back

The second new print was inspired by one of the many great pictures I came across in Bella Donna's Tumblr blog. I should warn you that it is NSFW, but it is a beautifully curated collection.


This is one one of many archive photos and sadly there are no details of the photographer. Performing a Google image search didn't help me on this occasion.

There are many invisible details that I have had to use my imagination for, such as the position of the feet in relation to the head and the expression on the model's face. It was a great challenge though and resulted in a nicely printable model.

Here's a side view of my digital version in red-cyan anaglyph mode (which I've just discovered you can do in NetFabb!). Dig out those glasses and have a preview.


This model just happens to be close to the exact proportions of my printer's printable volume, so this could turn out to be one of my largest models yet. At a layer height of 0.1 mm and a total print height of 125 mm this is going to take 18 hours to print. Keeping everything crossed for this one!

OK, printing successfully finished and here she is (iPhone included for scale).


Reflections

Here is the first of three new prints I have been working on recently.


'Reflections' came to my attention when Bruno Birkhofer posted a different picture on Google+ last week. All his pictures are beautiful but, once again, it was one of his black and white portraits that inspired me to try another sculpture.

Modelling the pose in my favourite character modelling program was fun, as usual, but it proved particularly tricky to place the hands in exactly the right position. Several of the joint movement ranges have to have their range limitations turned off just to get close. 

In a moment of over-zealous optimism I decided to replicate the model's facial expression and kept the eyes closed but the mouth open. This involved a significant amount of cleaning up in Blender for a detail that ultimately proved too small to show in the final print. 


Not to worry - one day I may be able to sell these models and perhaps I'll even be able to afford a nice high-resolution DLP printer like the Kudo3D and then they will look even better.

I'm now getting the hang of using Simplify3D to slice my models so that the support material is placed where it's needed. The only thing I got wrong this time was placing insufficient support underneath the ponytail. The tip broke free during printing but fortunately the print managed to correct itself leaving enough to look reasonably OK.

Here's a couple of photos of the final print using translucent coffee-coloured PLA from 3D Filaprint, at 0.1 mm layer resolution with support enabled.

Close-up reproducing the pose in Reflections


The full model, showing a nice reflection of its own


Monday 5 May 2014

Loopback

Another new pose inspired by this photo I found on Pinterest. The original photograph was taken by Mikhail Nekrasov.
(UPDATE - see Mikhail's comment below)


Character posing software really seems to struggle with extreme shoulder positions and this one was no exception.

I wanted to use Simplify3D again to make use of the excellent support material it generates. However, importing the finished model processed in Blender seemed to show artefacts generated by the eyes and mouth. Cura's Fix Horrible option still does a better job than Simplify 3D in this regard but unfortunately there is no function to export a 'fixed' file.

My standard solution in the past would have been to use Project Miller, the great experimental tool from Autodesk Labs, but it expired and ceased to work on 1st April 2014. Not funny!

Just on the off-chance, I reset my PC's clock to Feb 2014 and started the program up again. Bingo! It works perfectly. I fixed the model, exported a new STL file and loaded it up into Simplify3D. The new gcode looks clean as a whistle. Ready to start printing.

After a 12 hour printing run the print quality is already looking great.


This black ABS plastic always looks nice after smoothing with acetone vapour. Some of the horizontal banding caused by the print layers can become a bit more prominent though, so after breaking away all the support material I decided to try something new and gave the whole model a light sanding with a fine grit sandpaper first.


For models like this, I recommend doing the acetone vapour treatment in two halves. Holding the upper half of the model, I gently lowered the legs into the vapour for about 20 seconds and then set it aside to harden on a ceramic tile. Once the surface was hard to the touch several minutes later, I held the model upside down in the vapour and treated the head and body the same way.
This method gives a nice even smoothing without risking melting the lowest parts into a puddle of sludge.


And here's the original again.  How did I do?